Products are used to create your checkout as well as integrate all of your related tools/platforms. They are hosted in specific campaigns that you have set up.
*Learn more about using 1 or multiple campaigns
In your PayKickstart account go to “Campaigns”
Locate the specific campaign and click the product dropdown.

You can now select to edit, clone, delete or create products. For this example, we are going to +ADD(create) a product.

Inside the Product settings, you will notice the product settings composed into 3 sections.

Section 1: Product Details
Product Name: Internal name to help identify the product. Customers will NOT see this name.
Product Description: This is where you add a quick copy of content summarizing the product. Customers will see this description depending on which checkout template you choose later.
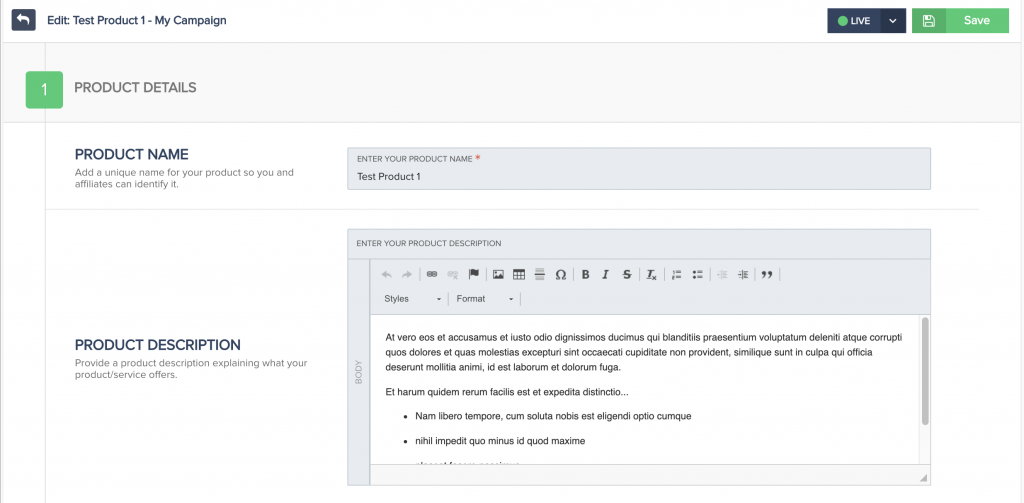
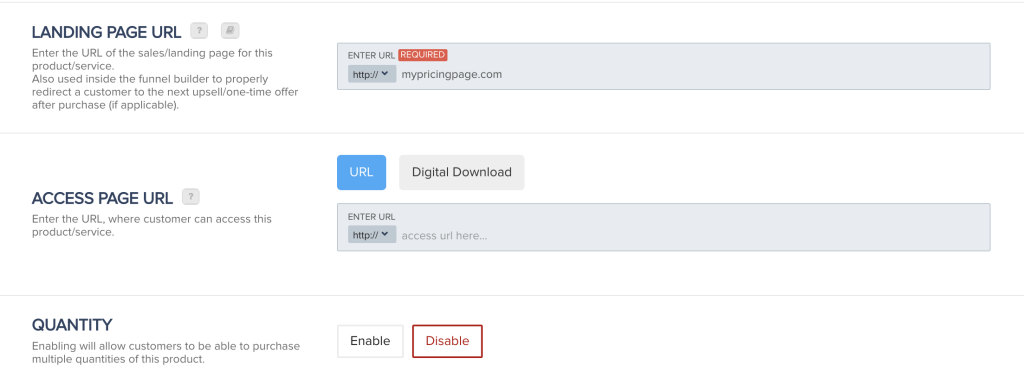
Landing Page URL(From your website): The main webpage on your site the product will be sold on.
Vendors can use any page builder to create their website pages, then use PayKickstart to add the checkout.
Access page URL/Digital Download(optional): Used to provide customer with access to a link or file download after purchase if the product/service is digital. Learn more here
Quantity: Do you want to allow the customer to select a quantity for your product? Learn more here
Payment Settings:
Products can be configured as a “One-Time Charge” Or a “Recurring Charge(Subscription)“
One-Time Charge This option will charge the customer one time for the total price.
- Price: Refers to the amount you want to charge.

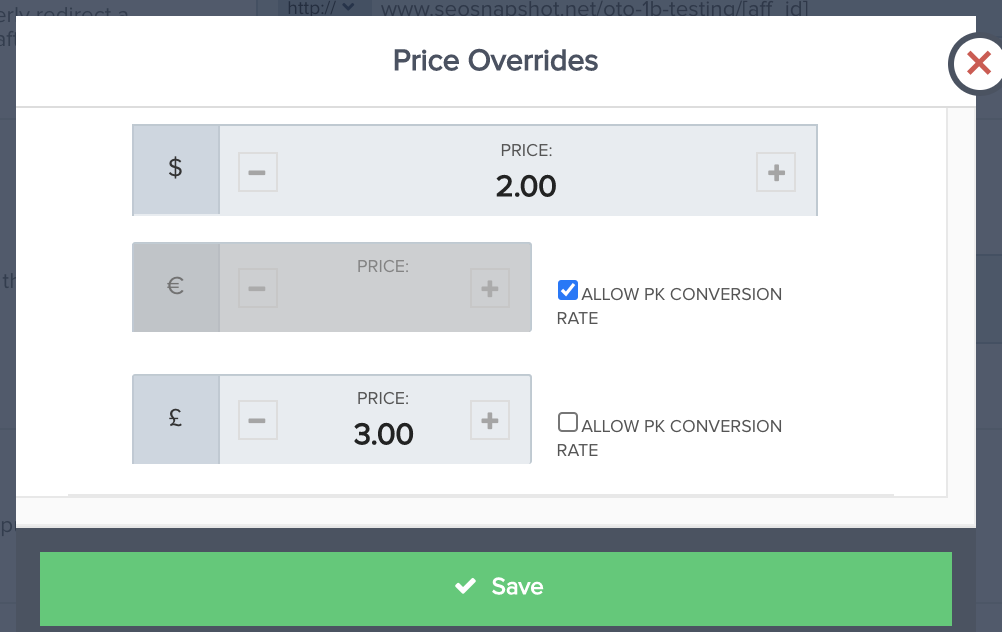
*NOTE: If you are using Multiple Currencies with the connected payment gateways, you will have the ability to set the product price for each currency.
When the customer selects their country (or from their IP address), if the associated campaign and the gateway selected support that country’s currency, then display the amount fields using that currency. If not, the default currency set on the campaign will be used.
- Split-Pay(optional): Is your product a large price? Want to offer the customer the option to break down the payment over smaller payments? Learn about enabling the Split-pay option here.
- Licensing(Optional): Are you selling a digital product or software that requires license keys to use? Learn more about enabling our license feature here.
Recurring Charge(Subscription) This option will allow you to sell a product that has a recurring payment cycle.
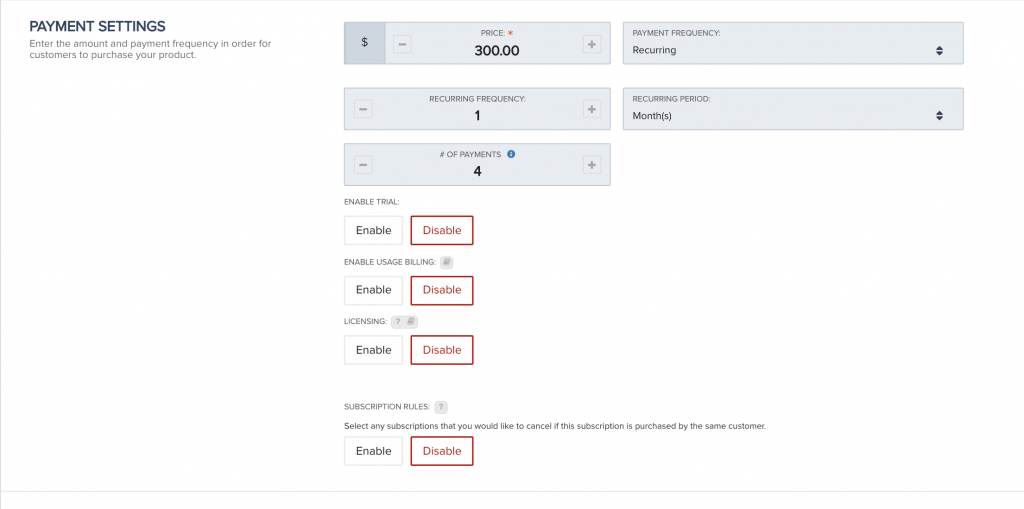
- Price: Refers to the amount you want to charge.

*NOTE: If you are using Multiple Currencies with the connected payment gateways, you will have the ability to set the product price for each currency.
When the customer selects their country (or from their IP address), if the associated campaign and the gateway selected support that country’s currency, then display the amount fields using that currency. If not, the default currency set on the campaign will be used.
- Payment Frequency: Should be Recurring.
- Recurring Frequency: Number which goes with the next field.
- Recurring Period: How often do you want to bill the customer? Example: $30 charge every 1 months
- # of Payments(optional): If you only want to charge the customer a set # of times, you can add the # of payment in this field. After all payments have been made, the subscription will show as “Complete” instead of canceled.
- Trial(optional): This option will allow you to set a free or paid trial period the customer will receive before they being the normal billing payments.
- Usage-Based Billing(optional): Feature used to connect with our API and charge customer based on consumption/use of the product or service. Learn about Usage-based billing here.
- Licensing(Optional): Are you selling a digital product or software that requires license keys to use? Learn more about enabling our license feature here.
- Subscription Rules: You can select other product subscriptions the customer may have to be automatically canceled if the customer purchases this product. EX: If customer purchases product C cancel product subscriptions A and B.
Pay What You want pricing
This option allows you to set a minimum price and then allow customer to choose if they want to pay the minimum or more.
Learn more about Pay What You Want pricing here: https://support.paykickstart.com/knowledge-base/pay-what-you-want/

Commission Settings(optional): If your campaign has an affiliate program enabled, the products in that campaign can allow for affiliate commissions. By default, the commission percentages will use the campaign settings, but if needed, vendors can also set commission percentages for a specific product that will override the campaign percentage for that product. Learn more about setting up affiliate programs here.

Collect Tax(optional): If needed, Paykickstart has the ability to set a tax profile for the product to charge customers tax. The tax amount(if applicable) would be applied to your main product pricing. Example: Main product($30) + Tax($10) = Total Price($40) Learn more about using and charging tax here.
*NOTE: Vendors have the ability to set multiple tax profiles for the same product if needed.

Rebill Reminder: If the product is a recurring subscription, you can send a rebill reminder email a set # of days before the customer is billed for their next charge.
Trial Reminder: If the Subscription product has a free or paid trial, you can send a trial reminder email a set # of days before the customer is billed for their first paid charge. Refund Period: Amount of days, the customer is applicable for a refund. Can be 0. The refund period will only be available to the customer via default PK thank you pages. Affiliates will be able to see the refund period on related commissions. Vendors will see refund periods in purchase records and affiliate commissions. Available On Billing Portal(optional): If the “available on billing portal” option is enabled it will allow customers to up/downgrade to other products in the campaign via the billing portal and update billing links. Learn more about the billing portal here Learn more about subscription billing update links here
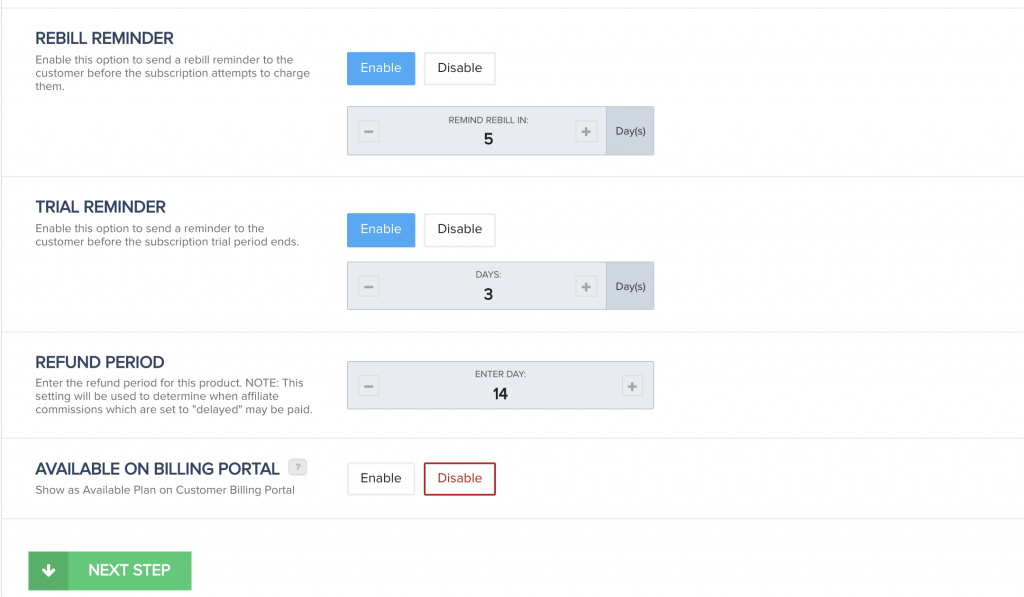
We are now ready to move to the checkout Page Section! Go ahead and click “Next Step”.

Section 2: Checkout Page
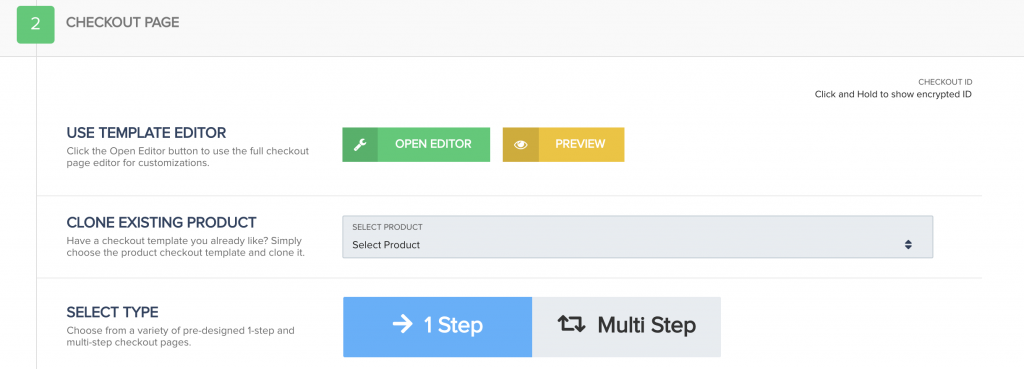
Template Editor: Inside the template editor you will be able to further edit the design and layout of your products checkout page. Learn more about using the template editor here. Note: if you plan to use Embed or pop-up forms instead of the default checkout page options, those templates will be selected and designed elsewhere. Learn more about using the optional Embed Forms and Pop-up Forms
Clone Existing Product: This will allow you to select a previously created product and use that template design on your new product.
Select Type: This option lets you choose if you want to use a one step checkout page or multi-step checkout page. Based on your selection the available template options will show for selection.
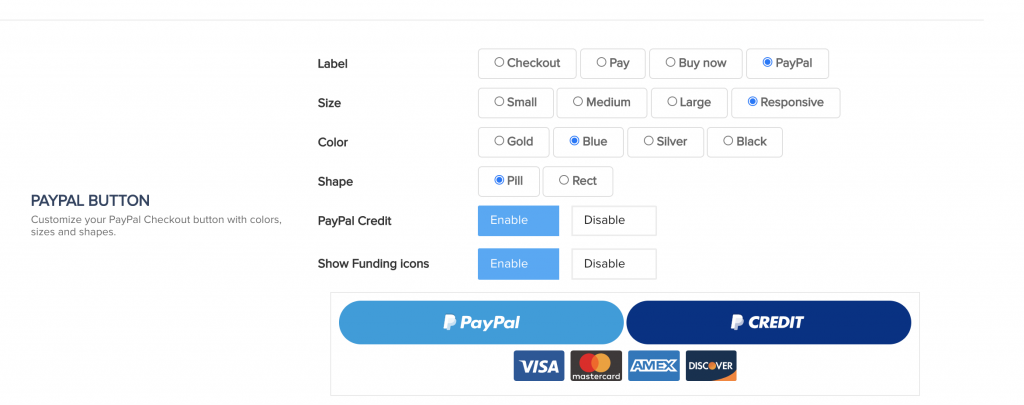
PayPal Button(Available for products in campaigns using PayPal)
If you have connected PayPal to the related campaign you will be able to choose the design of the PayPal buy button on the checkout.
- PayPal Credit(optional): If you have a US PayPal account and the product is $99 or more, you can enable the option to allow customers to purchase using PayPal Credit. Learn more here.
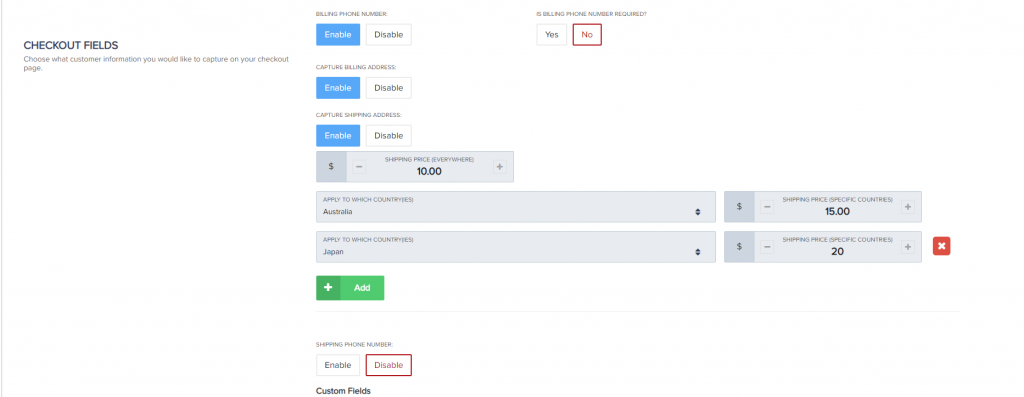
Checkout Fields: These options will allow you to enable/disable additional fields such as phone number, billing and shipping address as well as shipping costs.
- Billing Phone Number(optional): Adds a phone number field. Can be set to required.
- Billing Address(optional): Adds billing address fields for the customer.
- Shipping Address(optional): Adds Shipping address fields to the checkout and is used to calculate shipping cost, if shipping cost set.
- Shipping Price Everywhere: This is the default shipping rate you want to apply for the product.
- Applies to which Country(ies): This setting allows to set specific countries to charge a unique shipping rate for.
- Shipping Price: Set the specific shipping rate for the selected countries. *Note: You can add multiple unique country shipping rates if needed.
For shipping in specific countries apply these rules:- If all shipping specific countries selected in specific shipping price = currency in campaign, use currency in the campaign.
- If some / no shipping specific countries selected in specific shipping price using the currency in the campaign, use DEFAULT currency in the campaign (base currency).
- If no shipping specific countries selected in specific shipping price using the currency in the campaign, use DEFAULT currency in the campaign (base currency).
- Shipping Phone Numer: Enable for the customer to add a phone number to the shipping address. Can be required. *NOTE: If working with Physical products that you are shipping, learn more about our fulfillment management options here.
Custom Fields(optional): This option allows vendors to add additional fields to their checkout for various reasons.
Learn more about custom checkout fields here.

Product Name: This is the customer-facing product name customers will see on the checkout and related emails
Default Language: The language of the product checkout and related customer emails. By default, it will use the campaign language set, but can be changed per product as needed.

Testimonials(optional): Allows vendors to add customer testimonial to their product checkout. *NOTE: Not all checkout templates use testimonials.

Add Custom CSS/Tracking scripts(optional): This field gives vendors the ability to edit the checkout design by adding custom CSS code or they can also add 3rd party tracking scripts to trigger outside tracking analytic platforms. Learn more about using the CSS/tracking script field here.

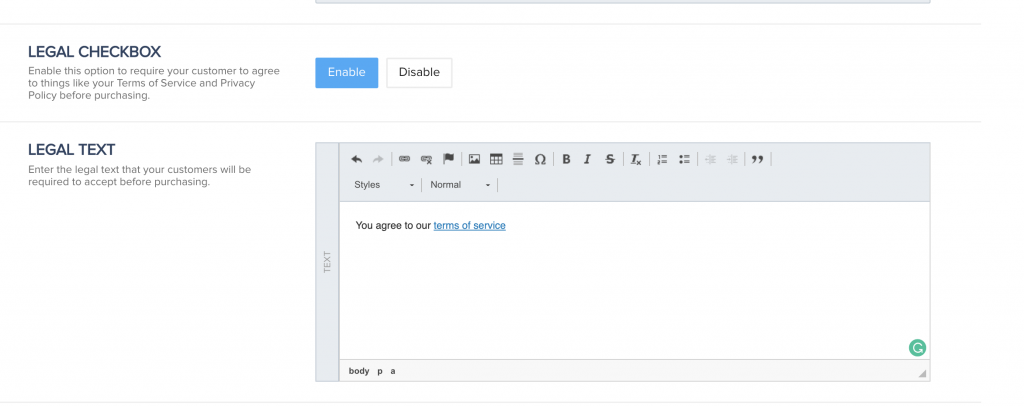
Legal Checkbox(optional): Enables a required checkbox field on the checkout that the customer must click before completing the purchase.
Learn more about Legal checkboxes here.
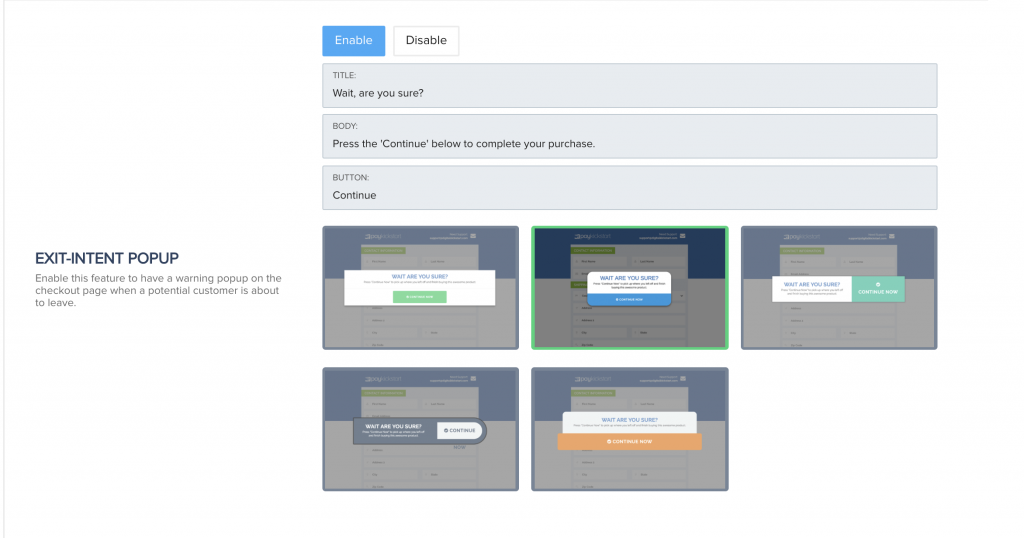
Exit Intent Pop-up(optional): Allows vendors to show a pop-up to the customer if the customer attempts to leave the checkout before purchasing.
Now we are ready to move to the last step of product creation.


Section 3: Integrations
The final section of each product will allow to connect related integrations with other tools and platforms used to manage the product and customer.
IPN Integrations(optional):
If using IPN URLs(Webhooks) in another platform, you can add them to a specific product to send IPN POST data after specific transaction-related events. Learn more about using IPNs here.

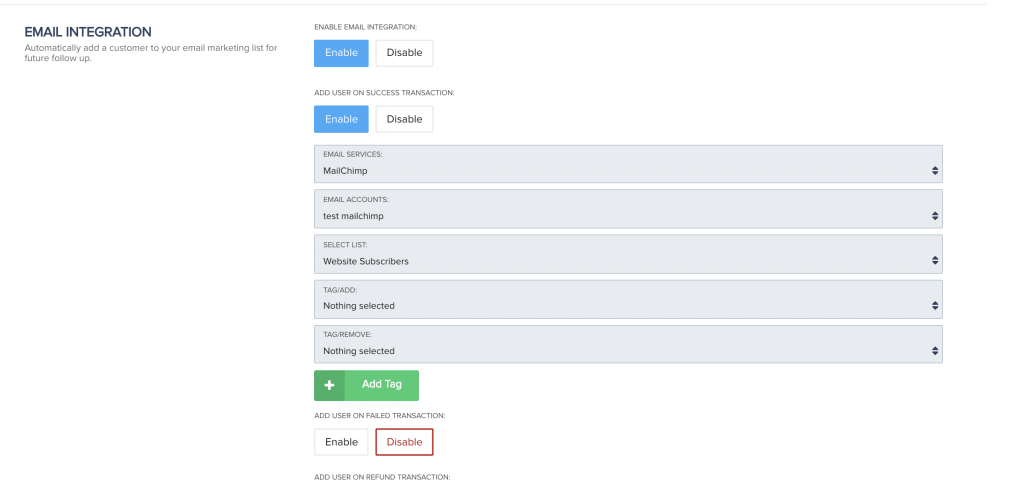
Email Integration(optional):
Email integrations allow vendors to add customers to email lists and add/remove based on action events.
See Email(Autoresponder) integration options here.
Webinar Integrations(optional):
Webinar integrations will allow vendors to automatically add a customer to a webinar call after they purchase the related product.
See Webinar integration options here.

Membership Integrations(optional):
Membership integrations will allow vendors to automatically create and manage a customer member account based on their purchase.
See Membership integration options here.

Fulfillment Integrations(optional):
If working With Shipstation, ShipOffers, or Shopify, you can integrate the product to automatically send order data based on the customer’s purchase status
Shipstation integration: https://support.paykickstart.com/knowledge-base/shipstation-integration/
ShipOffers Integration: https://support.paykickstart.com/knowledge-base/integrating-with-shipoffers/
Shopify Integration: https://support.paykickstart.com/knowledge-base/integrating-shopify/

Slack Integration(optional):
Vendors can send purchase event notifications to Slack if needed.
Learn about using Slack here.

Advanced Tracking Code Section(optional):
This area allows vendors to add and configure 3rd party purchase conversion scripts to send the purchase data to platforms such as FB pixels or Google Analytics after a customer makes the related product purchase.
Learn more about using the Advanced Tracking Code section here.

Now you can save the product settings and your product is now ready.

