
PayKickstart offers a few different ways to charge a sales or VAT tax to your customers.
#1. Our Taxamo Integration (learn more)
#2. PayKickstart Integration Tax System
*NOTE: Customer subscriptions will always use the tax profile set for the product at the time of subscription creation. It’s not possible to change a tax profile for an existing subscription.
*NOTE: With both our internal Vat system and the integration with Taxamo, you have the ability to not charge the customer if they provide a VAT ID.
*NOTE: Default tax profiles will use the tax ID set in your profile. Custom tax profiles can use your default tax id or you can set a custom tax id.
*NOTE: You can select to use multiple tax profiles for 1 product. You cannot select tax profiles together if both of the profiles affect the same country.
*NOTE: If you are collecting the Shipping Address for your products, the EU Default Tax Profile would use the shipping address as the default for charging tax, and Custom Tax Profiles allow you to choose if you wish the Billing Address or the Shipping Address to be used.
There are 3 locations on the platform to add your vendor tax ID depending on your needs.
1: If Tax was charged, and Tax profile has a custom tax ID: Vendor tax Id will be pulled from custom tax profile.
2: If No custom tax profile or no tax was charged, then we will use Campaign tax ID if Campaign tax ID is set.
3: If no custom tax profile, no campaign tax id, we will pull the vendor tax id from your profile.
4: Optionally you can also manually update the vendor tax id on a specific invoice copy if needed.
Tax Profile Types:
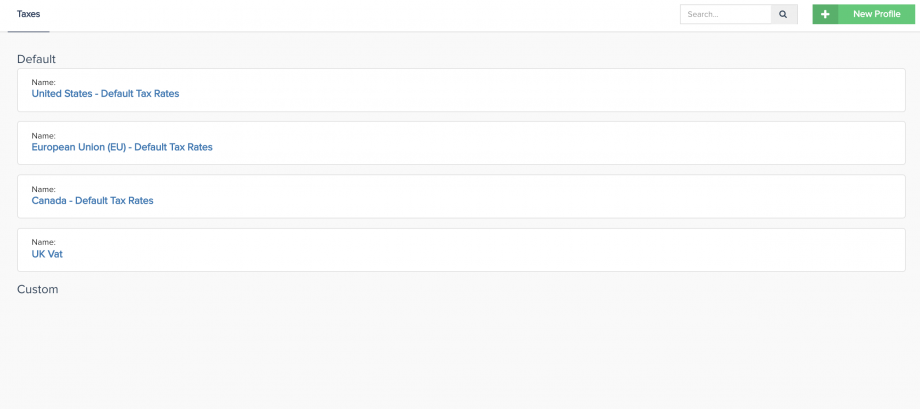
DEFAULT TAX PROFILES
Default tax Profiles:
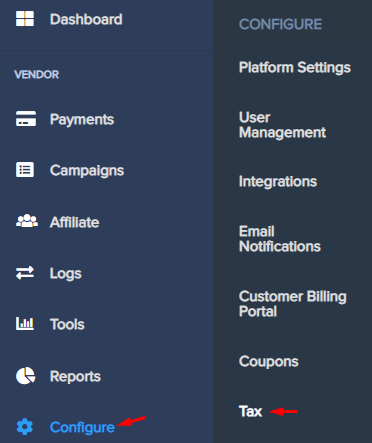
PayKickstart offers a way to charge a tax to your customers without having to use a 3rd party tax integration. To use our internal tax system go to Configure >> Tax.
You will see three “Default” tax profiles. US, Canadian, European Union and UK default tax profiles.
United States Tax:
US sales tax will charge ALL customers the sales tax amount for the related US state set in your Profile. This tax profile will charge the SAME percentage to every customer (regardless of their location). If you use our default sales tax profile, we will automatically charge by default your local state’s tax rate (specified in My Profile section – for US vendors only). You can always create your own custom sales tax profile and charge any percentage you would like.
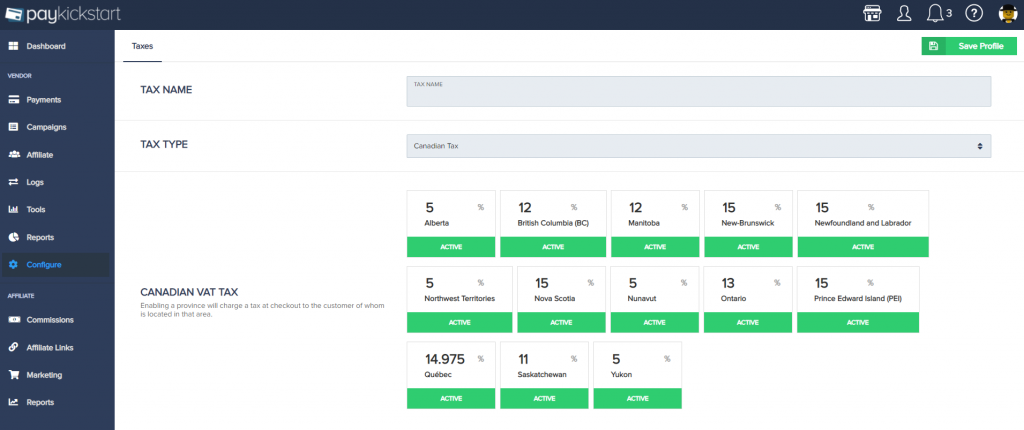
Canada Tax:
Will charge Canadian customers based on their Canadian province location.
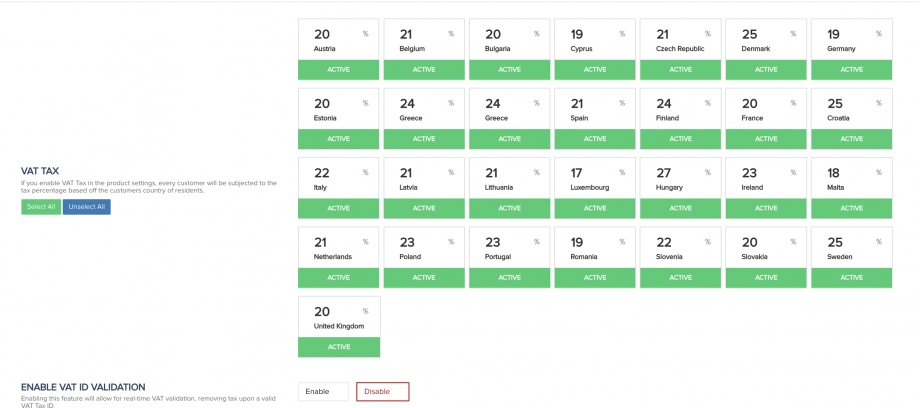
European Union Tax:
EU VAT will be related to the country set in your Profile. Customers will be charged or not based on their location and VAT ID. EU tax profiles do NOT include the UK.
EU VAT tax will be dynamic based and charge a customer based on their IP Address or Country they specify on the checkout page. Our default VAT Tax profile is updated every month with the most recent Tax rates per EU country. Alternatively, you can create a custom profile and specify any tax percentage you would like for any country. When you enable VAT tax on your checkout pages, we offer real-time VAT number validation, for when the customer enters a valid VAT #, then VAT is not charged at checkout.
For products you are collecting the shipping address for, the shipping address would be used as the default for calculating the tax if the address is located in the EU.
UK Tax:
Will charge UK customers based on their VAT ID.
CUSTOM TAX PROFILES
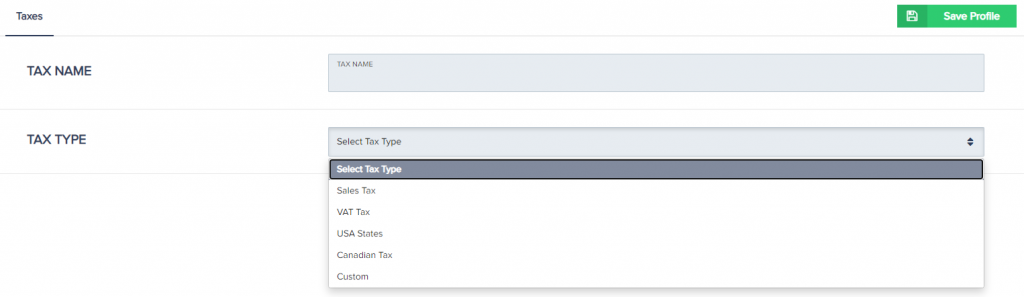
To create a new Custom Tax Profile, click on New Profile. Then give it a unique name and select the type of tax profile you would like to work with.
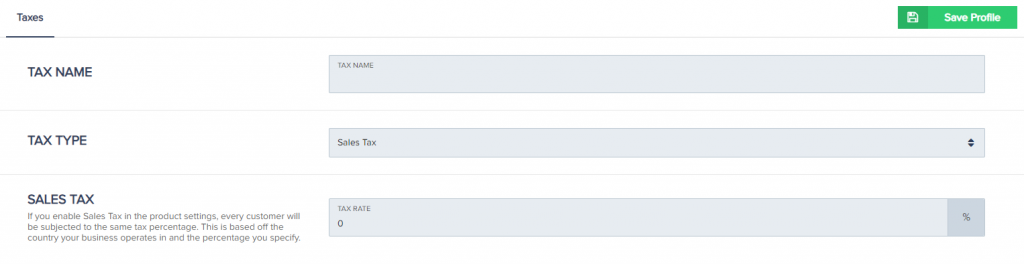
Sales Tax:
If you select Sales Tax, you will want to specify the tax % that every customer will be charged at checkout.
VAT Tax:
If you select VAT Tax, you can enable/disable which countries you would like to apply a tax to.
*NOTE:
Custom VAT profiles will charge all customers the VAT percentage from their country unless a Valid VAT id is provided and you have enabled VAT validation for the custom tax profile.
With both our internal Vat system and the integration with Taxamo, you have the ability to not charge the customer if they provide a VAT ID.
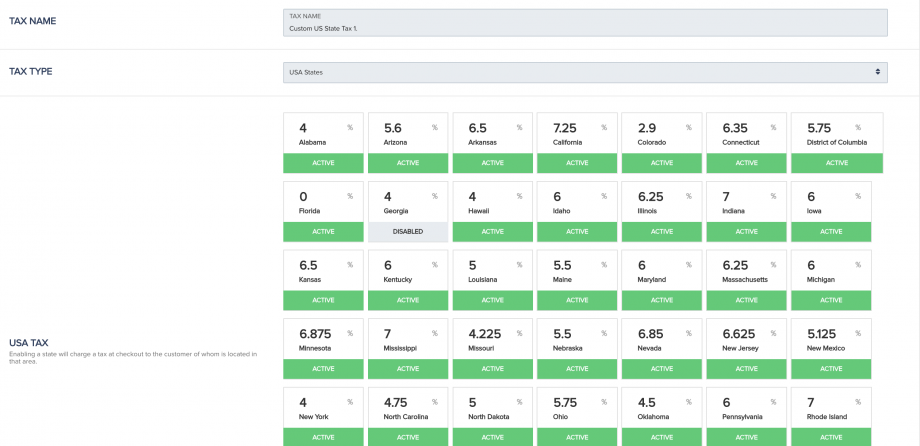
US States:
Custom US state tax profiles will charge the customer based on the customer’s location(State).
PayKickstart will automatically offer the default state tax rates, but vendors are able to set a custom tax rate for each state if they would like.
Canadian Tax:
If you select Canadian Tax, you can enable/disable which provinces you would like to apply a tax to.
Custom Countries Tax:
Custom tax allows you to add countries and set a country-wide tax rate.
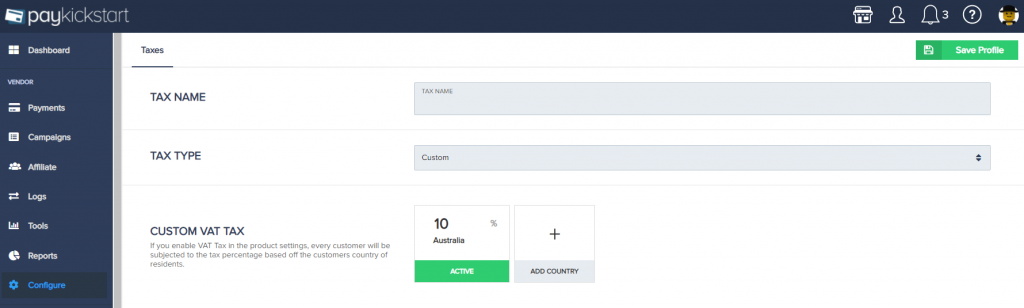
You may also click the “Add Country” button if you would like to charge customers from any specific Country a specific tax.
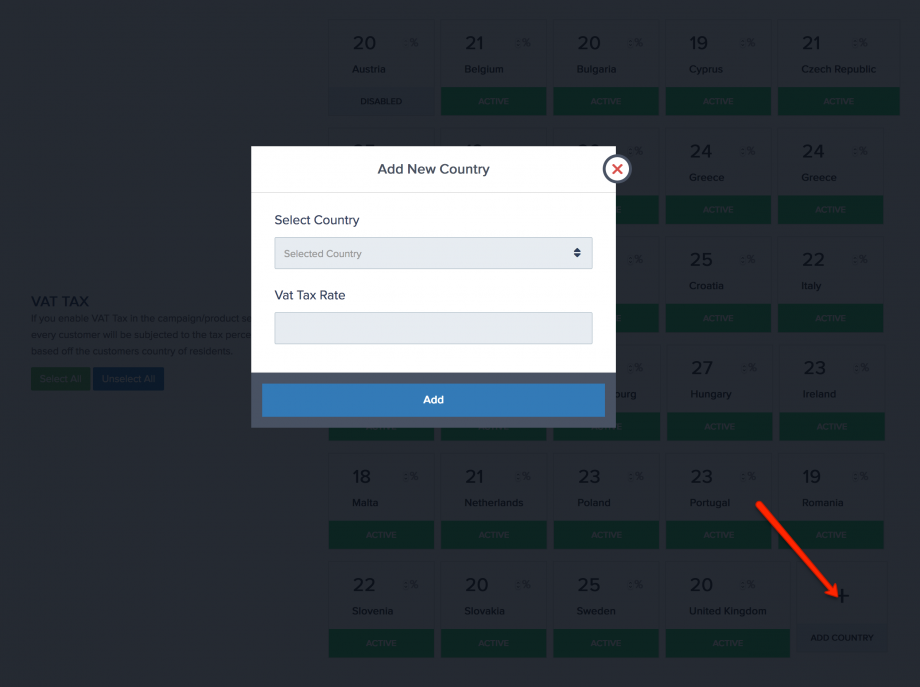
If using the custom tax profile option PayKickstart will show the tax as “Tax” or “VAT” on the checkout and invoice based on the customer’s country of purchase.
If the customer is from a country that uses “VAT”, then VAT will be shown.
If the customer is from a country not using “VAT”, then the tax column will display “TAX”
Custom UK Tax:
Will charge UK customers based on their VAT id.
BILLING OR SHIPPING ADDRESS –
TAX CHARGE CALCULATION RULE:
You have the ability to choose the address that would be used for calculating the customer’s tax for Default VAT Tax, Canadian Tax, and Custom tax profiles.
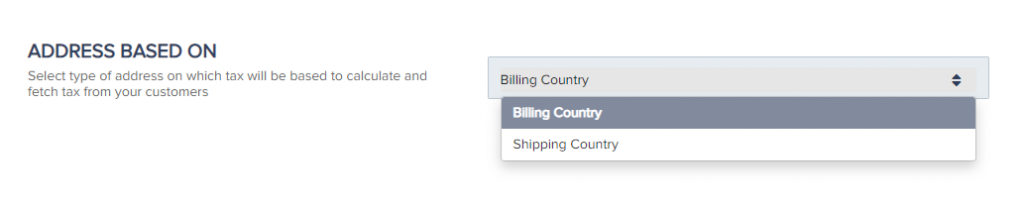
For products where both the Billing and the Shipping address are disabled for collection, the tax would then be calculated based on the customer’s current IP location.
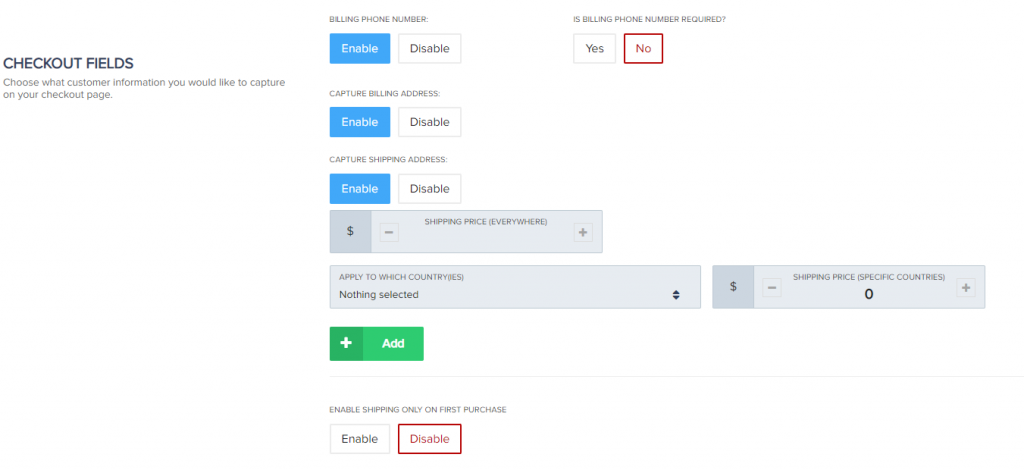
Please note that the product must have the option to collect the Billing Address and/or Shipping address enabled, based on the tax choice selected for your tax profile in order for their tax to be based on the Billing or Shipping address.
The Billing and Shipping collection can be enabled at Step 2 – “Checkout Page” of each of your product’s settings.
ADDING TAX PROFILES TO PRODUCTS
After you have created your Tax Profile(s), go to Campaigns >> Edit Product settings and select the tax profile you would like to apply to that product.
– Selected tax profiles added cannot share the same countries.

Multiple tax profiles can be selected on the same product to accommodate customers and tax requirements in multiple countries. Customers will subject to the specific tax profile based on their location.
- Tax allows multiple selections for PK (ONLY) tax service profiles.
- You cannot choose taxamo tax profile and PK tax profile in same time
- You cannot choose tax profiles with same countries. Only 1 tax profile per related country.
If you would like to capture the customer’s VAT Tax ID to help with tax compliance, you can go to Campaigns >> Edit Product settings.
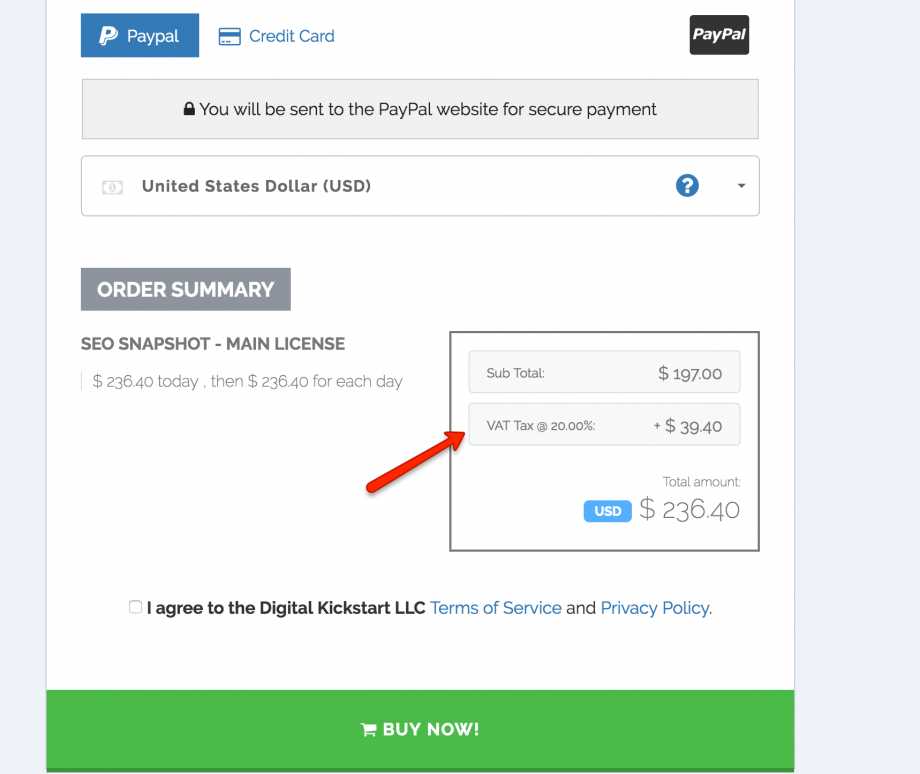
When you enable VAT tax on your checkout pages, we now offer real-time VAT number validation, for when the customer enters a valid VAT #, then VAT is not charged at checkout.
In the “Collect Tax” settings you will first Enable Tax, then Enable VAT ID.
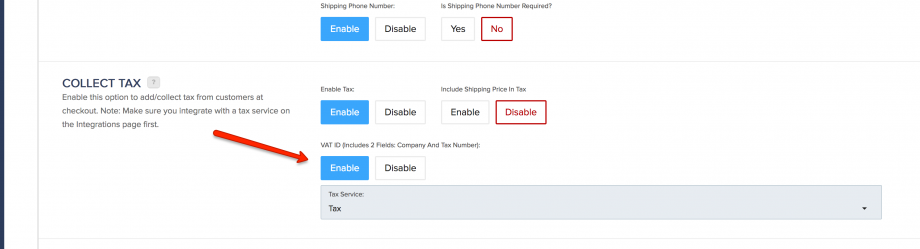
This will enable both the VAT Tax ID and Company Name fields on the checkout page.
Tax will show on checkout pages similar to this screenshot below.
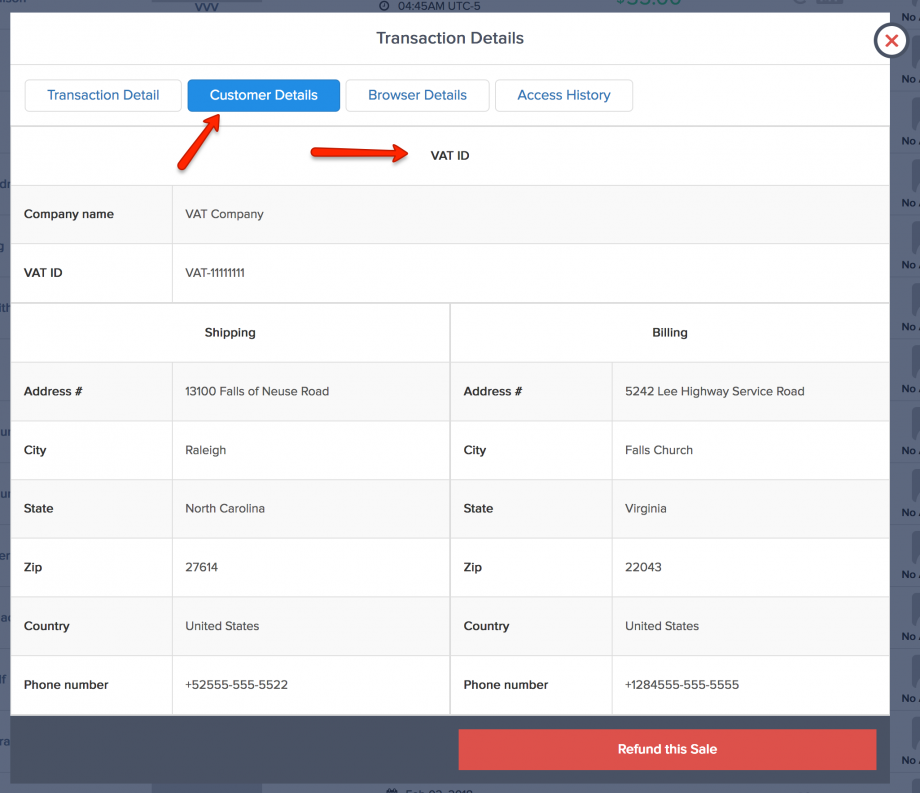
If VAT is enabled, you can find the customer’s VAT Tax ID and Company Name under the “Customer Details” section of the Transaction Details modal.
*NOTE: With both our internal Vat system and the integration with Taxamo, you have the ability to not charge the customer if they provide a VAT ID.
*NOTE: If related to a subscription, PK will validate the related tax before each customer subscription billing.