Chargeback Protection - Handle Disputes Proactively
This Knowledge Base article is designed to help vendors understand and set up the Chargeback Protection feature within PayKickstart. This tool allows you to resolve disputes before they become official chargebacks, protecting your merchant account health.
Written By Stefan S.
Last updated 4 months ago
Please Note:
Since this feature is a Beta Release, please cross-reference your dispute requests directly in your payment gateway to ensure full coverage.
This documentation and the feature itself are subject to change as we make further improvements.
If you encounter any hurdles or need assistance configuring your Chargeback Protection settings, reach out to our team. We’re happy to help investigate and test the feature together.
PayKickstart’s Chargeback Protection integrates with major alert networks to notify you the moment a customer initiates a dispute. By resolving these issues early, either through automated or manual refunds, you can prevent chargebacks from affecting your dispute ratio and payment gateway standing.
Step 1: Configuration
To begin, navigate to Configure → Chargeback Protection. This section allows you to link your payment gateways so that you can receive your chargeback alerts.
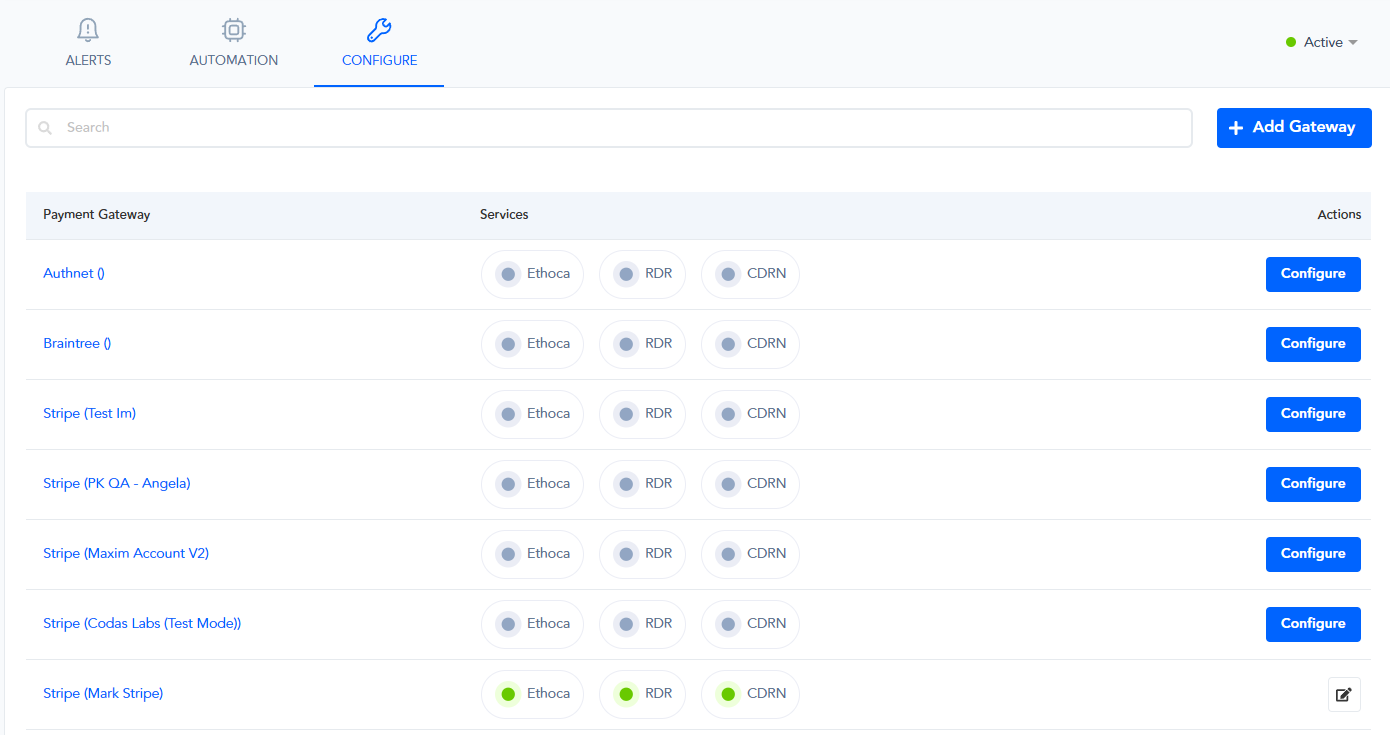
To accurately match pre-dispute notifications with your specific transactions, you will need to provide the following details for your gateway:
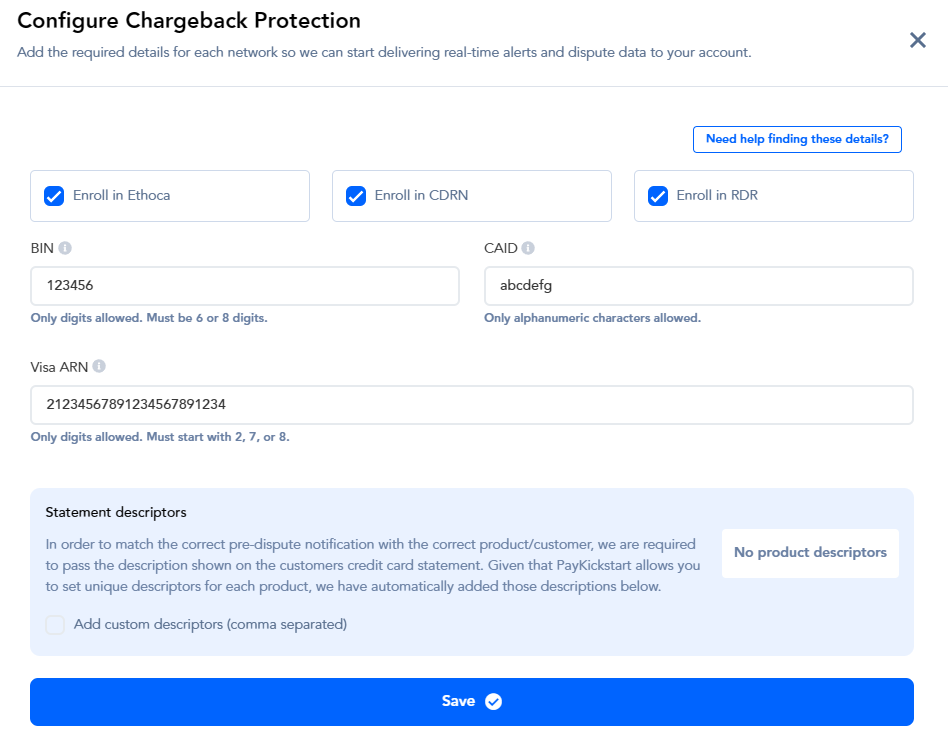
Finding your BIN (Bank Identification Number)
Finding your BIN (Bank Identification Number)
In the context of setting up your protection, this refers to your Acquirer BIN, the unique number that identifies the bank processing your transactions.
For Stripe Users:
You can't directly view your Acquirer BIN from the Stripe Dashboard.
The Acquirer BIN is a unique identifier used by card networks and acquiring banks, and it's typically managed behind the scenes by Stripe and its financial partners.
If you need your Acquirer BIN for a specific integration or compliance reason, you may need to work with Stripe or your acquiring bank partner directly.
For most users, this information isn't required for day-to-day Stripe operations.
Your Stripe representative or the support team can provide further guidance on how to obtain and use BIN details.
For Braintree Users:
Log in to the Braintree Control Panel.
Navigate to Settings -> Business.
Scroll down to the Merchant Accounts section.
Your Acquirer BIN is typically listed alongside your merchant account details. If it's missing, click "View" on your primary account or contact Braintree support.
In case the Acquirer BIN is not available within your Braintree dashboard, please contact their support team to help you obtain it.
For AuthorizeNet Users:
Log in to your Merchant Interface.
Click on Account from the main toolbar.
Select Merchant Profile.
The BIN is often listed under the "Payment Methods" or "Processor" section. If you only see your Merchant ID, you may need to call your Merchant Bank (the bank that handles your deposits) to ask for their 6-digit Acquirer BIN.
In case the Acquirer BIN is not available within your AuthorizeNet dashboard, please contact their support team to help you obtain it.
Finding your CAID (Card Acceptor ID)
Finding your CAID (Card Acceptor ID)
The CAID is a unique string (up to 15 characters) identifying your specific store location or transaction point. In many systems, this is synonymous with your Merchant ID (MID).
For Stripe Users:
In your Stripe Dashboard, go to Settings -> Business Profile.
Look for your Merchant ID. It usually starts with
acct_.
For Chargeback Protection, thisacct_ID serves as your unique CAID.
For Braintree Users:
Go to Settings -> Business.
Your Merchant ID (CAID) is prominently displayed at the top of the "Business" page.
Note: Ensure you are using the Merchant ID, not the Merchant Account ID (which is used for specific currencies).
For AuthorizeNet Users:
Log in to the Merchant Interface.
Go to Account -> Merchant Profile.
Your Merchant ID is located in the top section under "Business Information."
This 8 to 12-digit number is your CAID.
Finding your Visa ARN (Acquirer Reference Number)
Finding your Visa ARN (Acquirer Reference Number)
The ARN is a 23-digit tracking number assigned to a transaction as it moves through the banking system. It is required for Visa-specific alert networks like RDR.
To find an ARN (All Gateways):
To retrieve an ARN, you must find a Visa transaction that was refunded at least 3 to 5 days ago. (ARNs are not generated for new sales; they are generated once a refund has cleared the banking system).
Search: Go to your transaction or payment history and filter for Refunded transactions.
Filter by Card: Select a transaction where the customer used a Visa card.
Check the Date: Ensure the refund happened at least 72 hours ago.
Locate the Number:
Stripe: Open the refund details. Look for "Acquirer Reference Number" or "ARN" in the "Payment Details" or "Timeline" section.
Braintree/AuthorizeNet: If the ARN is not visible in your dashboard, copy the Transaction ID of the 3-day-old Visa refund and email your processor's support team: "Please provide the 23-digit Visa ARN for Transaction ID: [Your ID]."
Pro-Tip: If you have never issued a refund, you may need to perform a "Test Refund" on a Visa card you own. Wait 4 days after the refund, then follow the steps above to retrieve your first ARN.
Enrollment Services
You can toggle enrollment for three major industry networks:
Ethoca (Mastercard): Provides real-time alerts for Mastercard disputes.
CDRN (Cardholder Dispute Resolution Network): A Verifi (Visa) developed service that directs dispute notifications to you before they become chargebacks.
RDR (Rapid Dispute Resolution): An automated Visa system that triggers a refund based on rules you define, instantly resolving the dispute.
Statement Descriptors
Accurate descriptors are vital for matching alerts. PayKickstart automatically pulls descriptors from your product settings, but you can add Custom Descriptors to ensure they match exactly what appears on the customer's bank statement.
Step 2: Automation Rules
Navigate to the Automation tab to decide how PayKickstart should handle incoming alerts. Because dispute windows are often only a few hours long, automation is highly recommended.
Default Dispute Alert Rules
Choose between two primary handling methods:
Manual Review:
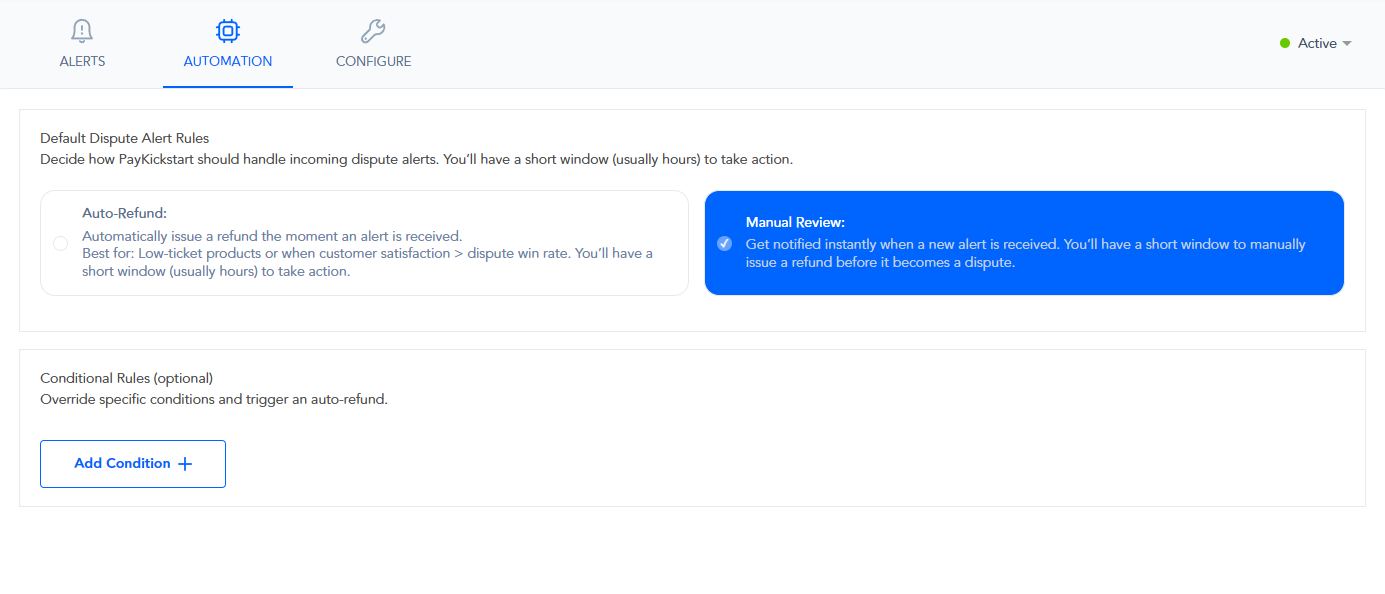
You receive an instant notification when an alert is received.
You must manually issue a refund within a short window (usually hours) before it escalates to a formal chargeback.
Auto-Refund:

The system automatically issues a refund the moment an alert is received.
Best for: Low-ticket products or businesses prioritizing customer satisfaction and account longevity over individual transaction retention.
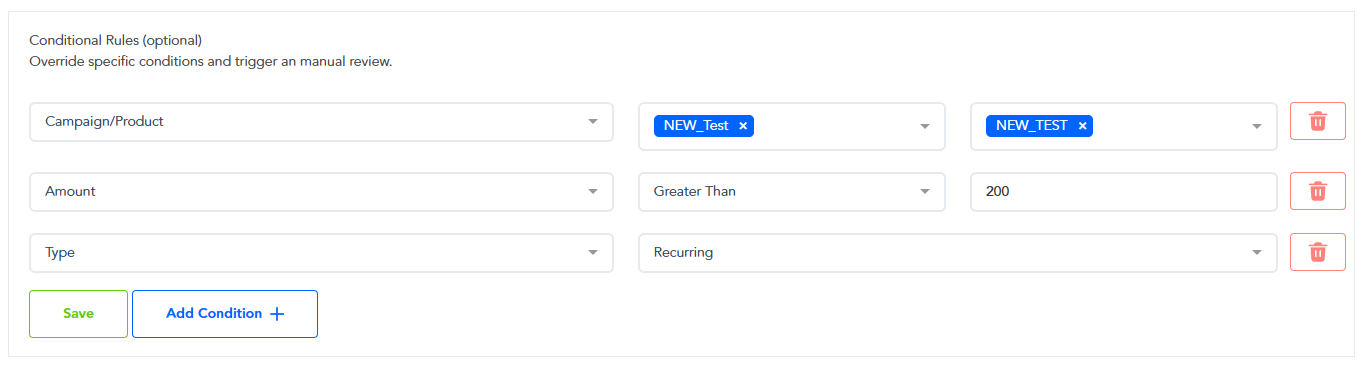
Conditional Rules (Optional)
You can set overrides to trigger a Manual Review or an Auto-Refund instead of the selected default option under specific conditions:
Amount: Set thresholds (e.g., manually review any alert where the order value is greater than $200).
Billing Type: Differentiate between One-time and Recurring payments.
Campaign/Product: Apply specific rules only to certain products or campaigns.
Step 3: PayPal Integration
For vendors using PayPal, the system handles Inquiries specifically. When a customer files a dispute, it often begins as an Inquiry stage before becoming a full chargeback.
Immediate Refund: Automatically refund the PayPal inquiry as soon as it is filed to prevent escalation.
Scheduled Refund: Process the refund one day before the inquiry transitions into a formal chargeback, giving you time to potentially resolve the issue with the customer directly.
Step 4: Managing Alerts
The Alerts tab provides a real-time dashboard of all incoming notifications.
Transaction ID & Date: Quickly identify the customer and order details.
Alert Source: See whether the alert came from Ethoca, RDR, or CDRN.
Status: View at a glance if the transaction has been Refunded (dispute resolved) or is Not Refunded (requires manual action).
Resolving an alert via a refund does not count against your merchant account's chargeback ratio.
This is the most effective way to keep your payment gateways active and healthy while reducing manual support overhead.
Was this helpful?
Still need help? Ask the team