Passing Transaction Data for Conversion Pixels
Written By Angela L
Last updated 10 months ago
We have a number of places where PayKickstart passes data to the vendor or allow you to add tracking scripts.
In terms of passing data, note that in both the thank you page and the IPN, the data is always sent as a POST (like a form submit).
The data is never passed through the URL (i.e. a “GET”).
There’s a number of good reasons for this, including that passing data as GET variables to pages we do not control often breaks the page we’re redirecting to (e.g. many vendors use page builders and many of those expect specific URL parameters – if we send them others their system often just returns an error instead of loading the page).
For 3rd party conversion scripts, we have an “intermediary” page which loads directly after each purchase. This is the page where you can add conversion scripts via your product’s settings.
IMPORTANT: Regarding the Facebook conversion pixel ONLY.
Due to FB and ios 14 logic updates the Advanced tracking code section NO LONGER WORKS for FB purchase conversion pixel.
INSTEAD → Use PayKickstart’s native Facebook Conversion pixel API Integration:
https://support.paykickstart.com/articles/0818923-facebook-conversion-api-integration
To add your Conversion Pixel script, go to the Campaigns section, then choose to edit the specific product you wish to pass data for.
Select the Checkout tab, and look for the Advanced Tracking Code field.

Within the Advanced tracking code section, you can add your conversion pixel code that would be placed in the Header and/or Body sections of your intermediate page.
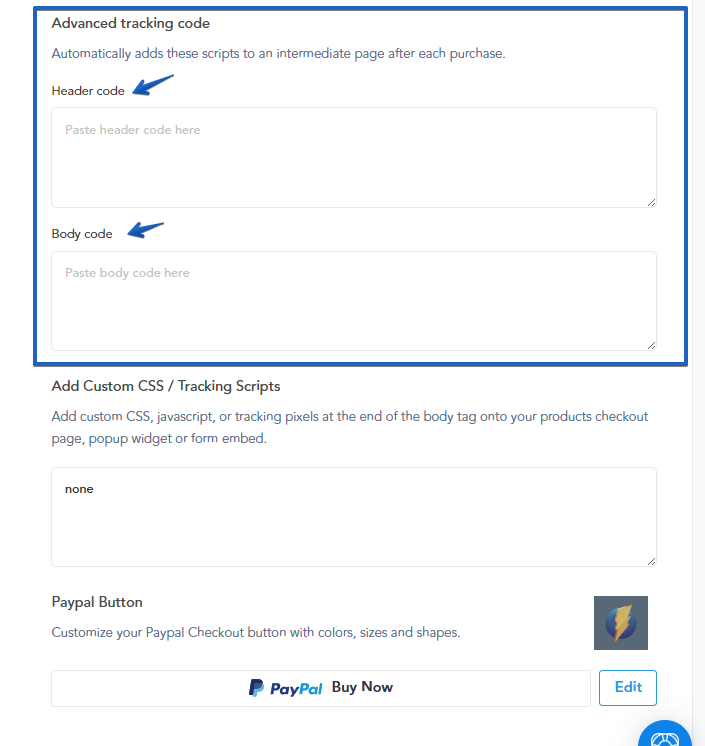
Once you’ve added your code, please make sure to Save your product’s settings.
This way, you will ensure the Conversion Pixel code runs after the purchase of the product is made, and before the customer is redirected to the next step of your funnel, or thank you page.
ome purchase data is available to be used by your script on this page, so if you add your script to that page you can grab the available data and use inside your script.
Following is the list of available data as Javascript variables:
For 3rd party JS scripts you would add these variables inside the <script> </script> tags.
The below fields will only be present in the case where an order bump is enabled and was also purchased. The fields will be available as part of the parent product’s data on the intermediate page (add conversion pixels to the parent product to track the bump).
For 3rd party JS scripts you would add these variables inside the <script> </script> tags.
Please Note:
If you would like to test the conversion script firing, add the following script code to the bottom of the “body” section.
This will cause the intermediate page to not redirect to the next page. Once the page is loaded, you can inspect it or view its source(view page source) as needed.<script>window.onload=function() { return true; };</script>
You would want to remove this test code snippet after testing.
Some vendors may need to add a delay to the script for testing purposes, or to ensure certain script have enough time to execute.
You can add this script, which will add a 5 second delay to the intermediate page, allowing a little extra time before the intermediate page fires.
You can change the delay by replacing the 5000 with a delay of your choice, in milliseconds.<script>
window.onload = function() { return true; }
setTimeout(function(){
var url = new URL(window.location);
window.top.location = atob(url.searchParams.get("url"));
}, 5000);
</script>